Search This Blog

Showing posts with label Iliocentrism. Show all posts

Thursday, August 20, 2026

A Long-Delayed Update On Progress Re-siding the House

(click on photos for a larger image) 

In the most recent ( July 14, 2025 ) update of the re-siding project, I showed the progress to that time on the west side of the main house.  Later that summer/fall we moved on to the south side, and this summer we have mostly finished the project; I still have a few small and/or odd shaped and/or difficult-to-reach pieces of siding to cut and install and quite a bit of trim and a lot of painting.  But, we've made real progress, and it's looking really good.

This photo is from late October 2025, showing the southwest corner of the house, with the south/back wall, other than the patio wall,  mostly complete. It required five levels of scaffolding (each level is 5 feet tall) to reach the highest points; Karen caught me in the final stage of dis-assembling the scaffolding.

To the left/west side of the above photo is a quick-and-dirty retaining wall I built to make it easier to put up the scaffolding when I get back to working on the west wall of the house; the difficulty is due to the at least five feet of difference in ground-level from the corner of the house to next place where a scaffolding frame would go.  The following photo shows the start of building that retaining wall, just to give you an idea of how quick-and-dirty building it was.  I drove T-posts into the ground and slipped construction-grade clay tile (which were once used as the basement-interior foundations of the house) over the posts, then filled the chambers with expanding foam.  This summer, I built a dry-stone wall, which leans into the clay-tile wall, and which I hope will allow this retaining to do its job for decades.

By way of contrast, the next photo was taken in July of 2025, before we had ripped the old wood siding off the south wall. I've since had that huge black walnut tree, arching through the upper right of the photo, removed.  It's much more sunny back there now, which is both positive and negative.  On the one hand, all that shade did work to keep the house cooler. On the other hand, all that shade, along with debris from the tree, fostered a thick growth of moss on the fairly flat roof of the sun-room, which was a maintenance nightmare.  And, had a storm taken out that tree, it would have done immense damage to the house.  So, sadly, the tree had to go.


In an earlier post of last year ( July 2, 2025 ), there is a picture of the gable-wall of the east bedroom, showing how I had rebuilt the window trim using PVC.  I was very satisfied with the result.  But, after that, and as I got to the point of rebuilding the trim for the kitchen windows, I realized I could get an even more dramatic result by making the verticals of garage-door trim applied backward, with the fluted side out, as shown below (though, I haven't yet completed the "topper" for these windows).

The next photo may give a better idea of how this treatment looks when finished.  Isn't that just gorgeous?  Sorry about the angle: this window is essentially on the third floor, and I had already started to dismantle the scaffolding before I thought that I ought to take a picture.


Continuing east around the house, almost everything visible in this photo is an addition I have made; only that bit of gable peaking out in the upper center of the photo is original.  In the center of the photo is the east wall of the "great room".  To the left of that is a covered patio, which I intend someday to be  a "three-season room". And on the right side of the photo is the breezeway between the "great room" and the garage/apartment addition, with the apartment's bathroom above the breezeway.

 
This is what the inside of the lower part of the "great room" window in the above photo will eventually look like.


This is the south/back wall of the garage/apartment addition. While I did continue the idea of fluted verticals for the window trim, so far I have decided to not make the "toppers" of these windows as elaborate as on the larger, more forward facing, windows.


This is the northeast corner of the garage/apartment addition (and, of course, more trim yet to install).  At first, I had not intended to paint that band of yellow between the grey of the body and the blue of the gables.  But the more I looked at it, the more I considered that a band of yellow between the grey and blue would help continue the "theme" of the original house, even tough this is siding rather than trim.  I'll probably eventually decide that I simply must also paint that white aluminum fascia yellow, to further consolidate the "theme".

This is the southeast corner of the garage/apartment addition.  I recently built that little roof the ladder is leaning against mostly because the roof above the small porch for the garage's man-door just ended, with a flat triangular "pediment".  I thought it was unattractive/unappealing.  There is no deck under this roof extension as I'm planning to built a small spring-use greenhouse there.

And this is the north-ish wall of the garage/apartment addition ("north-ish" because it is at an angle to the main house).  That big window in the apartment was once, long ago, in the living room, its original spot now being a doorway between the living room and the "great room".  I still have the wooden upper part of the trim I had built for that window, and it's in great shape. I'd like to reuse it, rather than building new of PVC, but so far I haven't found nails long enough to properly install it (it's very heavy).


This is the north wall of the "great room" addition in the foreground, which connects to the attached garage/apartment addition in the background.


This photo is from July 2025, of the north side of the original house, showing the wood siding I had installed in about 1990; it's the last side we'll get to. 

And this is how that wall looks now, still unpainted and with the trim not yet complete. I decided that I could rescue and reuse the wooden upper parts of the window trim, rather that trying to build new of PVC [it's amazing how much that stuff costs], as the roof overhang protects them from the worst of the weather.


This is a photo I took this past spring, from the street in the valley below the hill on which the house sits. The photo doesn't quite capture just how different the two elevations are.  This shows the south/rear side of the house.


And this was taken from the next street to the south, on the other side of the valley.


This is a picture my sister Karen took last fall, looking northeast toward the Town Square and the old industrial area in the distance  I think that the old factory you can just make out in the distance is the building in which the set was built for the filming of the cell-block scenes of 'The Shawshank Redemption'.

And she took this while standing on the (flat) highest roof of the house, that above the sun-room.  I'm pretty sure that the point isn't the scenery, but rather the roof-lines of my additions to the building.


And this is one of the fawns born this year (there were at least three born this year) to those damned deer which live in my yard.


Continue reading ...

Wednesday, March 11, 2026

Johnny Appleseed Didn't Sleep Here

I'm so disappointed -- my property is on a hilltop near the town square (I can see the buildings around the square when the trees are bare). The property used to be an orchard. I've seen an old hard-drawn "map" of the city from the 1800s showing the orchard; I don't recall the date on the map, but it was before Glessner Ave [the street 1/2 block north of my property] existed.
Anyway, I'm "disappointed" because the thought suddenly came to me today to wonder whether Johnny Appleseed [John Chapman] had planted the orchard that was on this property Apparently, while his city lot wasn't too far from here, his nurseries were further outside town.

Continue reading ...

Thursday, February 19, 2026

On Cement-board Siding

This is the text of an email I sent a friend about my experience and thought on cement-board siding --


=====
Around here [north-central Ohio], there were two options: "Hardie Board" (James Hardie Co.) from Lowe's, and "Alura" from Menards.  I used the "Hardie Board" on the sunroom (2nd/3rd floor addition), but overall I used the "Alura" even though it was more expensive. 

[Edit: I bought the siding from Menard's even though, ever since they went full "face-diaper nazi" during the Plandemic, I do my best to not give them any business. The prices at Menard's are generally lower than at Lowe's and Home Depot, but I *never* go to Menard's unless I can't find what I want at Lowe's or Home Depot; that's how much they pissed me off harassing me about not wearing a face-diaper. On top of which, while they "officially" ban mere pets from the premises, the use the HIPAA laws as the excuse to ignore that particular policy.  Odd: you don't dare make an assumption -- nor query -- about the health-needs of that person who clearly has brought a mere pet, not a service animal, into the store, but you're fully qualified to determine that *my* health won't be injured by forcibly/artificially restricting my breathing with an utterly useless and pointless cloth.]

I'll try to list what I see as pros and cons.

At Lowe's, the cement-board siding was in stock (*), and I could buy pieces individually, as I wanted/needed them. That (*) is because there are two widths, and in the end they didn't have enough of the width I was using. Or, perhaps it's that they started stocking pre-finished, rather than the "raw" I'd been buying.

On the other hand, the "Alure" from Menards was special order; a full "pallet" being 256 pieces (or, 1536 sq.ft. coverage).

"Hardie Board" — As far as I can tell, it comes only as "textured" to look like aged cedar which had been allowed to weather for many years without a proper coat of paint.  I *hate* the fake "wood grain" they put in vinyl siding, and that hatred is the main, or even only, reason I went with the "Alure", despite it being at least $2.00 more per piece.  Though, as it turns out, once the "Hardie Board" is painted, I doesn't repulse me, as I thought it would.

Pros — cheaper per piece; higher cement content (which results in some 'cons', and what might be a very big 'pro' in the long-term); available as unfinished (which for me was a 'pro', though obviously, other people will prefer the pre-finished);

Cons -- higher cement content: thus, heavier per piece, and more brittle; also more dense, meaning you'd need to drill pilot-holes if you use screws as attachment (just with the 12-15 pieces used on this project, we dulled a cement bit while drilling the pilot holes).  If I recall correctly, they make special nails for this siding, but I much recommend using screws, as one slip of the hammer could ruin your day.

By the way, the reason I put off re-siding the house for so many years after it was clear that I need to do so is that I was fearful of the cement-board being *too* brittle. The vinyl that is on most people's houses was never an option, I despise it that much. I was hoping to find a third option, such as a *solid* (and smooth surfaced) vinyl.

"Alure" — Like the "Hardie Board", it comes "textured" to look like aged cedar, but they also make smooth, untextured.  It can be either pre-finished (Sherwin-Williams paint) or "primed" (I use scare-quotes, because I couldn't see any priming on what was delivered to me).

Pros — lighter, due to being made of more fibers and less cement than the H-B; being less dense, drilling pilot-holes wasn't absolutely necessary, as the "self-tapping" screws we used were able self-tap; being less dense, it was easier to cut the pieces, and it was possible the "trim" or "fine-tune" it with a utility knife.

Cons — more expensive per piece; buying less than a full "pallet" of 256 pieces adds a surcharge for "breaking" the "pallet" 

Potential Con -- it seems to be composed of compressed layers; the potential 'con' is that several times, perhaps because we made some pilot-holes too close to the edges, the layers of small areas at corners de-laminated. 

==============
As mentioned, I bought unfinished siding, and painted it myself.  As Providence arranged it, right after I ordered the siding, I happened to come across 20 gallons of paint formulated for decks and floors (including for cement) on clearance at Lowe's for $20 per gallon. I bought it all. It wasn't exactly the color I had in mind, but it was close, and I really like how it looks contrasted with the yellow of the trim.

Continue reading ...

Monday, July 14, 2025

What I Did on My Summer Vacation

(click on photos for a larger image)

As I mentioned in the last post, thanks to prodding by my sister, Karen -- and her active help in doing the work -- I have finally started the much-needed project of re-siding my house.  In the last post, I focused on the easiest part of the project: re-siding what remains as exterior of the east wall and gable of the original structure. This post is about the west wall of the house: half being original and half being the 1930s addition to the house.

First, a couple of photos to illustrate just why residing the house (and especially the west wall) is so necessary.

As I'd said in the last post, part of the problem is that the wood siding I had installed in about 1990 wasn't the best quality wood -- what is, these days? And part of the problem is due to a mistake I made in installing it.   We see the result here: rotted wood -- my attempt the forestall this very problem actually contributed to causing it.


This photo was taken after we had ripped off about half the siding of this "bay".  This "bay" is part of the original structure, which was three rooms at ground and two rooms above.The (barely visible) "bay" to the right is part of the 1930s addition to the house.. 

The sunburst in the gable is from a demolished house, as are the pillars on the porch (not visible in this photo). The octagonal window and cedar shingles below the sunburst are my doing from about 1990. The triple window (for the kitchen) is also my doing (as are all the windows); when I bought the house, the original window in the kitchen had been replaced with one not much larger than the octagonal window.


This photo shows the start of re-siding this "bay". The white board above the foundation is a 1x12 PVC board -- expensive, but impervious to water. I'll run a band like this all around the foundation.  To be honest, it's strictly for appearance, as a visual "base" of the walls. 

The vertical 1x12s, on the other hand, which divide the walls into "bays", are not just visual, but also serve the purpose of allowing me to cover/protect nearly all the joints in the siding from weather/water.  The siding boards are 12' long, and fit between the vertical 1x12s; then I install a vertical 1x3 at the two sides of the vertical 1x12 to cover the ends of the siding.  Only on the front room (which is 20' wide) and the south wall of the dining room and master bedroom (which are 16' wide) will I have exposed joints in the siding in the expanses below the windows.


This photo, taken from the south-west corner of the house, shows the west wall with the new siding and trim up, as yet unpainted. I decided to forego painting it just yet as I wanted to move the scaffolding to allow us to install siding on the south wall of the sun-room (recall, that wall is in effect on the third floor). Even with the two of us, it took several hours to raise the five levels of scaffolding necessary to work on the sun-room south wall.


 And from the north-west.


As the west wall of the house gets the worst of the weather, I decided to build "false roofs" over the kitchen and dining room windows to divert some of the rainwater away from them.

The to-do list for this side of the house is:
1) install soffits under the "false roofs";
2) build/install the window treatments for the kitchen and dining room windows;
3) decide how I'm going to finish that bedroom dormer;
4) paint it all

This photo, taken from the south-west corner, shows the south wall of the house ... or rather, of the "main" part of the house -- there is a whole house-sized extension to the north-east. To the left, at ground-level, the basement door. Above that, dining room windows. To the right, living room windows. To the right, a covered patio (I originally intended it to be open to the sky, but I eventually roofed it, fearing that freezing water in the substrate would over time destroy the retaining-wall). Above the dining room is the master bedroom -- Yes! I still use that term. And to the right of that is the sun-room.

When I bought the house, where the sun-room is now was just a flat roof above the 1930s extension of the living room. I turned what had been a small bedroom and a small bathroom and hallway into the master bedroom (12x16), and replaced a small door which had opened from the hall to that flat roof with a large sliding-glass patio-door.  I thought, "Great! I have a private patio off my bedroom!" However, water always finds a way, and a few years later, water dripping from the roof above was leaking in at the patio-door. And that is why I built the sun-room ... which also has a flat roof, but it's tied into other roofs, rather than abutting walls, as the 1930s flat roof had,

I didn't have scaffolding when I installed the old wood siding in about 1990. What I had was two ladders -- of different lengths, and thus often different angles when extended -- and ladder-jacks, with a 2x12 bridging the gap. Can you imaging how much fun it was to install the siding above the master bedroom window?


Continue reading ...

Wednesday, July 2, 2025

Maintenance-free ... Or, at any rate, Better Weather Protection

UPDATED, showing almost completed result (click on photos for a larger image)..

I'm finally re-siding my house, which I have needed to do for several years -- the wood siding I installed about 1990 wasn't good quality, and, frankly, I made mistakes in installing it. So, sections of the siding, especially the west wall, were badly deteriorated.  

The biggest drawback to starting this project sooner was that I wanted the result to look much like the house's original look, but the nearest I could get was in vinyl ,,, and I detest vinyl (*) . The house's original siding is a style/design called "Dutch lap".  After I removed the (badly deteriorated) Masonite, which had probably been installed in the 1960s, I re-sided with pine "Dutch lap". Other than the knots showing through the paint, I was pleased with the result ... for a while. But, as I said, it wasn't high-quality siding, and I had incorporated a design flaw which allowed water damage.

The siding product I have finally settled on, after much resistance, is a cement/composite clapboard siding. I was able to get a smooth version of it; that is, without the fake "cedar grain" surface such as they sell at Lowe's.  Naturally, the smooth product that what I want costs more than that with the "cedar grain". Other than the original wood soffit/fascia at the roofline, I'll replace all the trimwork with boards made of PVC. Once painted, it will look look wood.

This first photo is of what is left of the east side of the original house.  By that I mean that my "great room" addition extends to the east of the original house, leaving only this bit of the second floor gable still expose to the sky.  This gable is my favorite of all of them -- I love how the cedar shingles and window-frame I installed in 1990 turned out. But, unless one is standing on roof of the "great room", the gable really isn't visible.

One of my sisters (Karen) volunteered to help me reside the house; that's what motivated me to finally decide on a product and start the project.  She took this photo of my progress as of her arrival in Mansfield last Friday noon.  

Because of the "great room" addition, there wasn't much tear-off to do on this wall: just a bit of siding below the frieze, the frieze itself, and the window frame (except for the top treatment, as the cedar shingles were cut and installed around that).  The sort of taupe-colored siding to the left of the window is the new (unpainted) cement-board siding. The body of the house will be painted to the color of these cedar shingles; the cedar shingles in the gables will be a lighter grey (I painted these with the body's color to see what an expanse of this color would look like; the trim will be a yellow close to what it now is.


The first photo was taken on Friday (June 27). This second photo was taken on Sunday. I think. There is a bit more detailing to do, and of course, the painting.  The trim which is yellow in this photo is either original to the house, or, in the case of the window frame header, what I had made in 1990. The trim which is still white is the new trim made of PVC.  The still-raw wall to the left of the photo (above the original gable) is part of the "sun room" addition.

It has been terribly hot and humid (and raining!) since my sister arrived, so we're moving slowly.  With this being to the east, we could work on this area only a couple of hours in the morning and then in the afternoon once some shade had developed.


===================
(*) Why do I detest vinyl siding? It's not the fact that it's vinyl which I detest, but rather the way it's manufactured, and intended to be installed, and that it tends to provide a foothold for the growth of algae (and I have enough problem with that).
 
1) Properly maintained wood siding does not show wood-grain; but vinyl siding is made with an ugly and pointless faux "wood-grain" ... which just happens to provide a convenient home for algae to anchor itself in.  Why do you think you see so many 'nice" houses with a hideous green film down their sides?

2) Vinyl siding is hollow, and it shows from a mile away.  Now, IF they would cover a solid wood or composite substrate with a vinyl coating -- smooth, of course, no faux "wood-grain" -- I'd have no complaints about vinyl siding.

3) Because vinyl siding is hollow, separate pieces don't butt together, but rather one overlaps the other. And it shows (from a mile away).  This "feature" also provides a convenient access for high winds to rip the siding off an entire wall.
 
4) Because of the way vinyl siding is designed and intended to be installed, there is a high probability that water will get between the siding an the structure.  
 
Water is the great enemy of buildings; well, water and the myth of "maintenance-free"  When I first bought the house, I had to rebuild an entire wall because water had gotten behind the Masonite siding which had been installed at some point with the (false) promise that it would make the house "maintenance-free".

UPDATE (2025/07/14):
This is almost finished result of the re-working of the east bedroom gable, after I decided on the color to paint the gable's cedar shingles (the color in this photo isn't the best: the blue of the cedar shingles is indeed a "deep" color, but it's also "vibrant" -- Ah! The color does show better in the "expanded" view). I still need to scrape and repaint the original-to-the-house soffit and fascia; that won't get done any time soon.

Finally, here is a wider view, also showing the east wall of the sun-room addition. I still have to build the window framing/treatment for both walls of the sun-room.

We managed to install siding on both exterior walls of the sun-room.  I use the word "manage" because the (unseen) south wall is in effect on the third floor, as the basement floor is grade-level on the south side of the house.  We had to put up five levels of scaffolding to be able to work on the south wall.

Lest you think that this is all we accomplished during the two weeks my sister was here, I'll make another post showing how/where most of our time was spent.


Continue reading ...

Sunday, May 18, 2025

A Glimpse of Old South Bend, Indiana

I was born in South Bend, as was my mother, and I lived there until I left for college. I recall an old-world looking area downtown, on the river; long since demolished for "urban renewal", its interesting topography leveled ... and then left vacant for decades.
The neighborhood of interesting old houses in which my grandmother had owned several properties, one of which we owned after her death, is long gone; prey to "urban blight" and then "urban renewal" ... i.e. properties turned into "Section 8" or welfare rentals to extract as much income as quickly as possible while expending as little as possible on maintenance.
Mansfield Ohio, where I have lived since 1982, never flew as high, nor grew as large, as South Bend did. And so, oddly enough, there is still more of the "old-world look" left in Mansfield. At the same time, Mansfield did demolish its old, and beautiful, government buildings to replace them with modernist monstrosities, whereas South Bend sometimes re-purposed its old government buildings when the government "outgrew" them.
Interestingly, the now-extinct Studebaker Corporation, which fueled most of the growth of South Bend, was originally founded in Mansfield.
=====
EDIT: As I'm watching the video, especially toward the end, he keeps voicing some weird, inchoate conspiracy theory about not trusting the timeline. I suspect that he's pushing that "Tartaria" bullshit. Oh, well; it was nice seeing pictures of beautiful old buildings, some of which I recall from my youth.
PS: I attended the Studebaker Elementary School, an old photo seen at the 23:26 mark (in my time, it had extensive single-storey modern additions 'round about), in kindergarten and first grade, and then again in 6th and 7th grades. After that, my father managed to get us into a private Christian school ... because the administration of the school wanted to come down on me -- a mere kid -- for calling out, to their faces, their cowardice in the face of mob behavior by "ghetto" black students. Mind you, this was way back in the early 1970s; that is how long the people who rule us have been winking at, and indeed encouraging, the very sort of "ratchet" behavior which is destroying or civilization.


Continue reading ...

Wednesday, April 23, 2025

A Working 1st-floor Bathroom

(now updated -- click on the photos to see a larger image)

2025/01/04:

My sister, Karen, came over from Indiana for a week to goad me into getting some work done on my house.  One of our projects was getting the downstairs bath operational again.  I still have some detail finish work to do, including re-surfacing the tub. This is what the room looked like as of New Year's Day -- 

This bathroom had been a "junk room" for many years, ever since one winter day when a cold draft coming through gaps in the old dry-stone foundation froze the supply line to the toilet and caused the shut-off valve to disconnect from the line. Fortunately, I was home when it thawed, and so I was able to shut off the water in the basement before too much flooding occurred.

Yes, I used a windowed door for this room -- I wanted more natural light to be able to reach the interior/central hall from which one accesses the foyer, the living room, this bath, the "front room", and the stairway.

You might notice the two rust-stains on the door-jamb to the left (fortunately, they will be hidden under the door-stop trim work).  That is from a massive water-damage event several years ago when the supply-line to one of the sinks in the second-floor master bath froze and burst due to raccoons getting into the lower attic and ripping out a lot of insulation.  I was out of town when it thawed (at the time, I worked a 2+ hour drive from home) -- every room in the house, but two, suffered water damage.


EDIT 2025/04/ 12:

The downstairs bath is fully functional and is nearly complete; just a few trim pieces to cut and install, and a bit of the woodwork to stain and finish.

This photo is of the bathtub, refinished both inside and out. The outer refinishing involved striping multiple payers of old, probably lead-based, paint, and then applying primer and enamel paint.  While the directions for the refinishing kit (for the inside) say that that it can be applied with a brush, we found that we got a much better result by using small rollers, and the work went much faster.

I may someday look into finding a more decorative faucet for the tub, but for now this functional one is fine.


As mentioned above, the door into this bathroom is a "french" windowed door.  On the inside is mounted a sheet of plexiglass with a decorative film applied to it. I wish the photo did it justice. I'm really satisfied with how it turned out, especially when the door is viewed from outside the room.

In the corner, behind the door, is a cheap kitchen wall cabinet mounted atop the baseboard, for linens and such.  We continued the wainscoting around the side of the cabinet (thus hiding the "raw" particleboard of which it is constructed ... as I said, it's a cheap cabinet).  I built the cabinet's countertop from strips of oak flooring glued together.

To the right of the above photo, you can just see the edge of one of the two in-the-wall shelving units we built. They're to the same design as the open-shelf spice cabinet I built for the kitchen (as seen below).


This photo is from the doorway, toward the outside wall. This bathroom is a roomy 8 feet by 8 feet. My mother, who was wheel-chair bound, was still alive when I first designed the room; I wanted to be sure it would be comfortably usable for a person with limited mobility.

The wainscoting is a PVC-based product which I got from Home Depot.  It's lightweight and waterproof, of course, and can be cut with a simple utility knife. But, the ease of cutting it is also its one drawback -- it can be easily dented/deformed by localized pressure.


This photo of of the door, taken from the hallway. It's a better view of the result, but still doesn't do it justice.


Continue reading ...

Tuesday, April 22, 2025

I miss beautiful buildings

The linked page has pictures of the old Richland County OH courthouse and one picture of the older courthouse. Both were beautiful buildings, and both are long since demolished.

The current county courthouse is an ugly modern monstrosity, built in 1968. Similarly, the current Mansfield city hall is also an ugly modernist thing.

Come to think of it, Anderson IN, where I lived/worked straight out of college (1980-1982), had also replaced both the beautiful old court house, which was of a similar style to this one, and the old city hall with hideous modern buildings. In the case of the courthouse, it was already falling apart -- there were barricades all around the building, with covered walkways to the major entrances, to protect passers-by from bricks falling from the facade.

My hometown of South Bend IN converted the two most recent "old" courthouses to other uses, rather than demolishing them.

Continue reading ...

Thursday, March 13, 2025

A "Canning Kitchen" in the Basement

 Ah. I did have a photo of the "canning kitchen" I built in the basement a couple of years ago.

I had bought these cabinets (and more I've not used yet) from a neighbor a few years ago, as I couldn't bear the thought of them sitting out in the rain and being ruined. Someone made these cabinets by hand from quality plywood, possibly as long ago as the 1950s, and certainly before the end of the 1970s. They're far better quality than anything regular people can afford these days.
I'd been thinking for some time that it would be nice to have a "canning kitchen" in the basement. So, after I replaced the kitchen cooktop, I decided that rather than tossing the old one, I'd use it and these cabinets to make a kitchen in the basement.
It has occurred to me that this "spare" kitchen is nicer than any kitchen my mother ever had.


Continue reading ...

Saturday, August 24, 2024

A (Twisted) Nursery Rhyme for My Imaginary Children

If I'd had a son, I had planned to name him James Joseph (in Southern: Jimmy Joe!). Since twins run in both sides of my family, if there had been a twin, he'd have been Joseph James (in Southern: Joe Jim!). This would have named them after my father, his father, and his father.  Rather than referring to them non-specifically as "Twin", as my brother and I did to our sisters until they insisted we call them by name, either boy, or both at once, would be "JJ".

If I'd had a daughter, I had planned to name her Rachael Marie, thus naming her after my mother, her grandmother, my grandfather's sister, and a not-quite-grandmother who lived with us until her death. A twin would have been Sarah Marie; there are no Sarahs in the family that I know of.  Any daughter, no matter how many, would have had Marie as a middle name (as all my nieces do).

So, here is the (twisted) nursery rhyme:

Hush, little baby, If you don't cry,
I promise to smack you bye and bye,
Or maybe I'll turn you into a pie,
We'll have such fun if you don't cry.


Continue reading ...

Thursday, August 22, 2024

Saturday's Child

I noticed that my upcoming birthday is on a Saturday. I thought I recalled that I was born on a Saturday, so I looked it up. Sure enough, I'm a "Saturday's child". According to the old rhyme, "Saturday's child works hard for a living." But, truth be told, I never had to work particularly hard for my living.


Continue reading ...

Friday, July 5, 2024

Sometimes, Impatience Works Out OK

 A few weeks ago, I bought several pounds of peaches at Meijer's for less than $1.00 per pound.  My thought was to can them as sliced peaches.

However ... I got impatient when blanching them (to remove the skin). On the second batch, I didn't let the water get hot enough before I dropped in the peaches. So, of course, the skins didn't come off.  I tried again and again on that batch, and never got it right.  By the time I gave up on blanching that batch, and just pealed them (which wastes a lot of the flesh of the peaches), the seeds themselves were warm. 

And, because peeling peaches really butchers the fruit, I wasn't getting nice, attractive slices.  So, I decided that instead of canning the peaches as slices, I'd make a peach version of applesauce or apple butter.  And again, impatience hit.  It was getting toward evening, and I didn't want to leave the peach puree simmering in the crock-pot over night, so I canned it while it was still too runny.

However ... the result is so good: it's like the "peach nectar" we were sometimes served in grade school, but thicker/pulpier.  I had sprinkled in some cinnamon, nutmeg and allspice (*), which does make a nice addition to the natural peach flavor.  I wish I could share it with you, it's to tasty.

I liked the result so much that I bought more peaches to do it on purpose.  On the second go, I didn't even bother removing the skins; I decided to see whether the immersion-blender would puree the skins after the peaches had cooked down. It was a success.

I also canned a few quarts of mixed apples and peaches.

(*) I've never bought -- or used -- any of those seasonings, myself. I "inherited" these containers from my mother back in 1988, and had never used them.


This picture is of some Asian lilies which used to grow near the front door.  But, after a doe and her yearly fawns made my yard their home-base, they kept eating the plants.  Before the deer killed the plants entirely, I moved the bulbs to the fenced-in garden, and they have finally recovered.  These things are 7-feet tall!


Speaking of deer -- the other morning when I went out to see whether the groundhog who keeps trying to get under the fence into the garden had managed to do so overnight (as it turns out, he tries several times per day during the daylight hours), this year's twin fawns were near the garden. I didn't notice them at first.  As I was pulling weeds, they came over to investigate me.  I heard/saw them and stood up.  I motioned with my hands to the braver one to come closer ... and it did, a couple of times. But, finally, the more timid one spooked and took the courage of the less timid one with it.  The fawn *seemed* to want to come closer to me, it was practically frolicking. 

And, speaking of that groundhog -- the other day, when I went out to check on his latest attempt to get under the fence, he was at that very moment so intent on getting under the fence that he didn't notice me until I was just a few feet away. And, as I hadn't yet cut back the herbs growing at the base of the fence, I didn't notice him until he spooked.

These next two pictures are of opposite ends of a bed beside/above the driveway which had gotten out of control when I worked out-of-town.  This is *after*  I cleaned it out the overgrowth (and poison ivy). I now need to rebuild the retaining wall. That's a good 30 feet from the garage around to the sidewalk, and another 20 feet past the sidewalk.

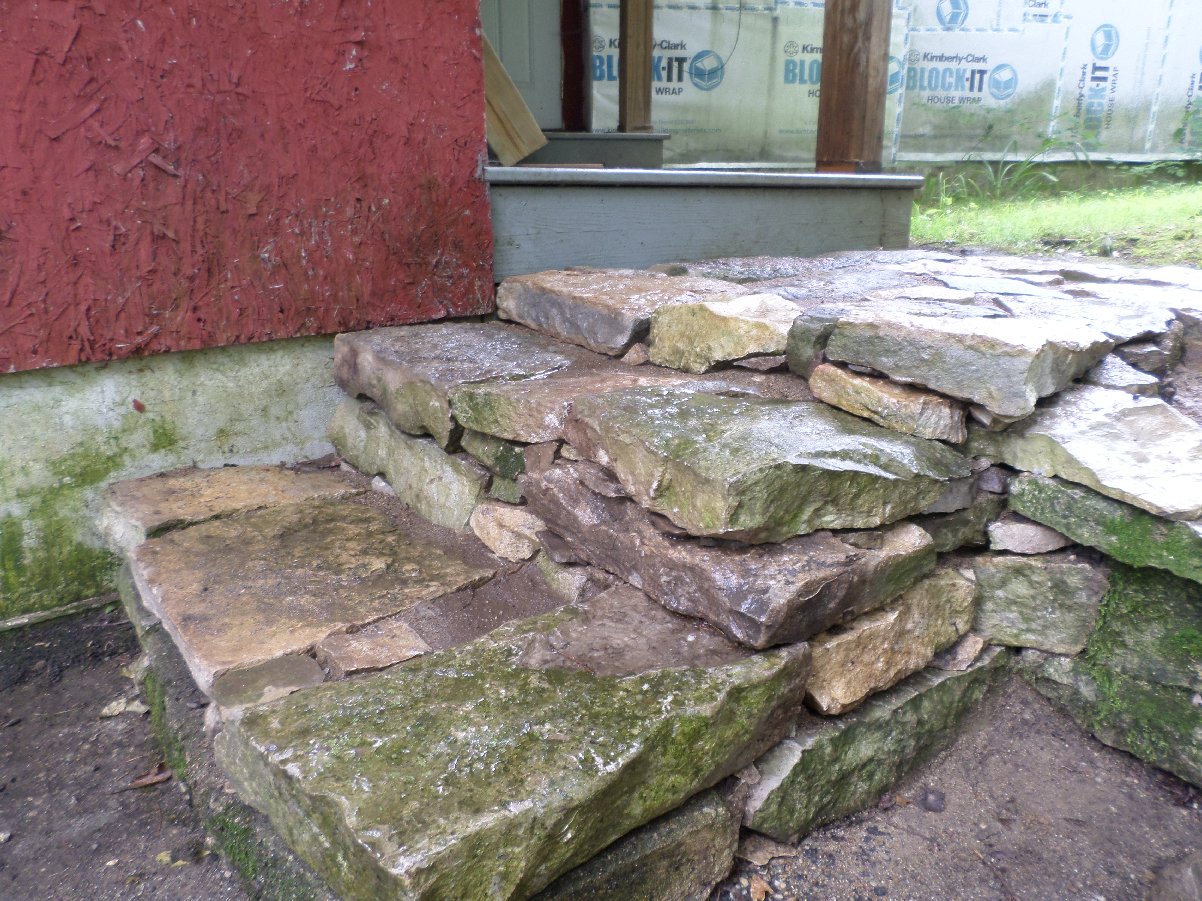
The first phase of rebuilding that retaining wall is to build some steps from the driveway up to the yard (and giving access to that side porch).  I just finished the steps today. It was like putting together a 3-D jigsaw puzzle ... but the pieces don't have pictures on them, and they are from several different puzzles. But, I'm pretty satisfied with the result:


This last picture shows the retaining wall from the new steps toward the sidewalk.  Those stones on the driveway are not from the retaining wall, but some of them will end up in it.  These are the rejected candidates for the new steps.


UPDATE (2024/07/20): Today, I got that groundhog which had been getting into my garden: stabbed him with a potato fork.

A couple of days after I first wrote this post, he finally found a place where he could dig under the fence.  So, I spent a day digging out the soil on the outside of the fence along that side, and buried lengths of cement-board siding just below the fence (**). Of course, there were still other sides of the fence where I can't dig up on either side of the fence without killing plants.

This fellow was stubborn ... and really pissed off that he couldn't get into the garden as he had before. For several days, he tried digging all along that side of the fence: he'd toss out most of the soil, I'd put it back, and he'd do it again. Then he tried the areas where in the spring I had buried cement-board on the inside of the fence.  Finally, he moved to the side with no cement-board below ground (I had planted this area before I thought of the cement-board solution).

For the past several days, he had been getting into the garden and eating my plants.  It's possible that he even climbed the fence to get in.

He was in the garden when I left for the hardware store earlier today. He was still in the garden when I got back, though I didn't realize that until after I had filled in the hole he'd dug at the corner of the fence.  So, I got the potato fork and gingerly went after him ... and, much to my surprise (and delight), he cooperated with me and let me spear him.


(**) ,,, on the outside of the wood "skirting" at ground level. Due to the fence-posts being on the outside of the "skirting", it's not a snug fit.  In the fall, I plan to move these cement-boards to the inside of the fencing


Continue reading ...

Friday, October 27, 2023

A Prodigious Feat

A couple of days ago, I had four more spruce trees cut down (2 living and 2 dead -- and that will be $2000 plus tax). The tree service company got to them two weeks earlier than expected.

For the past two days, I've been working at getting the debris out of the yard. Today, I finished cutting up and rolling into the woods the largest log (@18" in diameter and perhaps 20' long), which was blocking getting the lawn tractor into the side yard, where two of the others are located.

I should have taken a picture before I started cutting up the big guy, as a memento of what a prodigious feat that was. Prodigious feat though it was, it might easily have been worse, as the log was lying on a slope.

One of the dead trees might well have taken out the power line when it fell, so it had to go. Due to its lean, the other dead tree would almost certainly have hit the house when it fell.

The two live trees might also have hit the house had they fallen (the big one was less than 10' away, the other simply that tall). It turns out that the live trees weren't diseased, but I'm glad they are down. A few years ago, a buddy of the farther one just fell over one day -- it's base was riddled with fungus mycelium.

It's too bad that I don't know anyone who could have used the wood of the big spruce. It was such a nice length of perfectly straight wood.

======
The Emerald Ash Borer is killing ash trees all across the US. Naturally, a lot of the trees on my property are ash -- and the woods are full of dead fallen trees.

Last year, I had some ash trees along the property line dropped. A couple of them were close to 24" diameter. This spring, a couple of large (and very dead) ash on a neighboring rental property fell over, fortunately not hitting the building. Recently, the owner had a crew in to clean up the fallen trees (they were at it for at least a week). The crew cut up and hauled away not only the recently fallen trees, but also some of the ones I had had cut down. Now, I didn't mind that too much -- less work for me -- BUT, they also carted off the wood I had already cut and split and which was clearly on my property.

======
A groundhog has made a way into the garden.  So, come spring, I'll have to figure out a way to groundhog-proof the fence.  That will be fun, I'm sure.  So far, the only idea I have is to dig out the soil all around the perimeter so I can staple a width of hardware cloth (i..e wire mesh) to the garden's wooden skirting, having the mesh projecting below ground level.  Then fill it back in, of course.

Any ideas will be appreciated.

I *hate* animals.

Continue reading ...

Monday, September 18, 2023

Getting the Message

 A man is telling a friend about his day.


My daughter came home from college today and said 'Dad, cancel my allowance immediately, spend my college fund, change my bedroom into that gym you've always wanted, burn all of my clothes, take my TV, my laptop and all of my jewelry. Sell my car, change the locks to the front door and throw me out. Then visit your lawyer to remove me from your will and find a way to legally disown me."

The friend says; "Wow, she really said that to you?"

The man replies; "Well, her exact words were 'Dad, I've decided to change my major and get a gender studies degree'. But, I got the message."

Continue reading ...

"I was looking back to see ..."

Recently, I was reminded of a ditty my father sometimes half-sang when I was a young child, by which I mean as far back as can remember. I especially recall always being amused both by the structure of the lyrics and by the story they told.  

This is how I recall it (which is not exactly as the Internet has the lyrics) --
=====
[Oh] I was looking back to see if [she was] looking back to see
If I was looking back to see if [she was] looking back at me;
[She was] cute as [she] could be [there] looking back at me
And it was [very] plain to see that I'd enjoy [her] company.
=====

I had always assumed, I guess, that this was a ditty from his youth, perhaps in the manner of a folk song.  It never occurred to me that it might have been a commercially recorded song.  Recall, I was a child ... and anything Daddy did was amazing and unique.

Anyway, I googled the first line.  As best I could at first make out from the results, it was recorded by Buck Owens in 1972.  What!  I turned 15 in 1972, and I recalled it from much earlier in my life than that, nor would the lyrics have seemed so witty if first encountered at that age.

But, then, I happened to click a link which implied that it was recorded at least as early as 1954. Another site said it was *popularized* by Buck Owens in 1955. That makes more sense in the "story of my life".  My father was single and about 27 in 1954, 28 in 1955.

EDIT: When my father would sing his little ditties. he'd "keep time" by lightly clapping. He had terrible timing.

Continue reading ...